n8n setup guide
FlowTrigger connects directly to n8n workflows through webhook nodes. No middleware, no accounts — just paste an n8n webhook URL into FlowTrigger and your phone becomes a trigger for any n8n workflow. This guide covers n8n-specific setup for every trigger type.
How do I get a webhook URL from n8n?
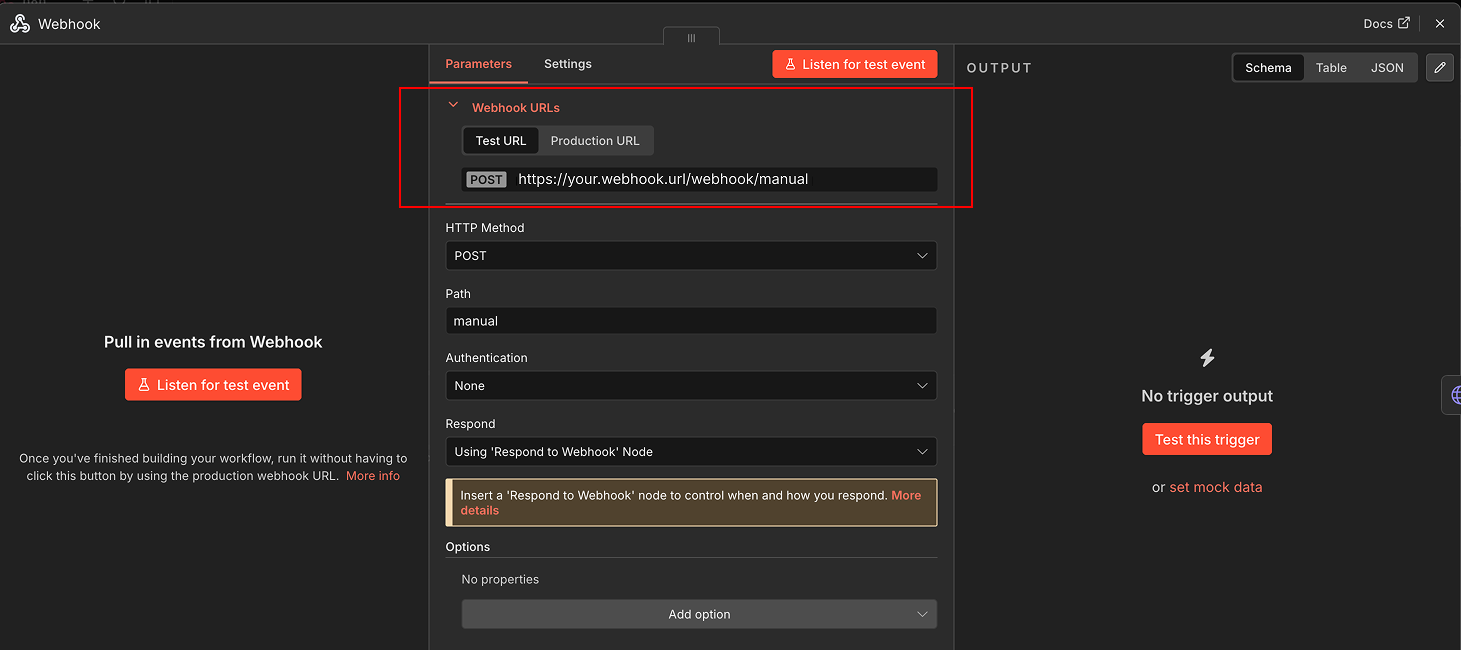
Every n8n workflow that receives data from FlowTrigger starts with a Webhook node. Here is how to set one up:
- Open n8n and click Add workflow (or open an existing workflow).
- Click + to add a new node and search for Webhook.
- Add the Webhook node to your canvas.
- Set the HTTP Method to POST.
- n8n generates two URLs for the Webhook node:
- Test URL — Only works while you have the workflow open in the n8n editor and have clicked “Listen for test event.” Use this while building and testing your workflow.
- Production URL — Works when the workflow is activated (toggled on). Use this URL in FlowTrigger for day-to-day use.
- Copy the appropriate URL and paste it into FlowTrigger’s trigger setup.
This works identically on n8n Cloud and self-hosted n8n instances. The only requirement is that the URL is reachable from your phone’s network.
Tip: Always test with the Test URL first. Open your workflow in the n8n editor, click “Listen for test event” on the Webhook node, then fire a trigger from FlowTrigger. You will see the exact data structure n8n receives, which makes building the rest of your workflow much easier.
How do I access FlowTrigger data in n8n?
After the Webhook node receives a request from FlowTrigger, all fields are available in n8n expressions. The exact fields depend on which trigger type you are using:
- Manual trigger fields — text, photo, and audio inputs
- Chat trigger fields — message input and session ID
- Notification trigger fields — app name, title, body, category, and timestamp
- Location trigger fields — GPS coordinates, transition type, zone details, and device name
Accessing fields in n8n expressions:
- Text fields:
{{ $json.textInput }},{{ $json.notificationTitle }},{{ $json.latitude }}, etc. - Binary files (photo/audio from manual triggers):
{{ $binary.photoInput }}or{{ $binary.audioInput }}— these appear under the binary tab of the Webhook node output.
When files are attached, FlowTrigger sends the request as
multipart/form-data. When only text is sent, the content type isapplication/json. n8n’s Webhook node handles both formats automatically.
Routing different data types:
Use n8n’s Switch node to route requests based on which fields are present. For example, route by the transition field for location events (ENTER, EXIT, DISTANCE), or by notificationPackageName for notification triggers to process notifications from different apps separately.
How do I build a chat workflow in n8n?
FlowTrigger’s chat trigger sends input and sessionId to your webhook. To return a response from n8n:
- Webhook node — Receives the chat message.
- AI processing node — An AI Agent, OpenAI, Anthropic, or any node that produces a text response.
- Respond to Webhook node — Returns the response to FlowTrigger.
Configure the Respond to Webhook body to include the AI output in the output field (or whichever field name you set in FlowTrigger’s Chat Response Field):
{
  "output": "{{ $json.response }}"
}
Conversation memory: Use n8n’s Window Buffer Memory node connected to your AI Agent. Set the session key to {{ $json.sessionId }} from the Webhook node — this preserves conversation context across messages for each chat trigger session.
How do I use n8n AI agents with FlowTrigger?
n8n’s AI Agent node lets you build tool-equipped AI assistants accessible from your phone via FlowTrigger’s chat trigger:
- Webhook node — Receives
inputandsessionId. - AI Agent node — Connect an LLM (OpenAI, Anthropic, Gemini, etc.). The agent receives the user’s message from
{{ $json.input }}. - Tool nodes — Attach tools to the AI Agent: Calculator, Wikipedia, HTTP Request, Code node, or any n8n node that acts as a tool. The agent decides when to use each tool based on the conversation.
- Window Buffer Memory — Set the session key to
{{ $json.sessionId }}to preserve context across messages. - Respond to Webhook — Return the agent’s response in the
outputfield.
How do I handle file uploads (photos, audio) in n8n?
When a FlowTrigger manual trigger includes photo or audio attachments, the request is sent as multipart/form-data. n8n’s Webhook node handles this automatically.
How n8n processes files:
n8n’s Webhook node automatically detects multipart/form-data requests and converts file uploads into binary data. After the Webhook node executes, you will see:
- JSON tab — Contains text fields like
textInput. - Binary tab — Contains file fields like
photoInputandaudioInputwith their MIME types, file names, and binary data.
Accessing files in subsequent nodes:
- Reference the photo:
{{ $binary.photoInput }} - Reference the audio:
{{ $binary.audioInput }}
Common processing patterns:
- Write Binary File node — Save files to the n8n server’s filesystem.
- Google Drive node — Upload files directly to Google Drive. Select “Binary data” as the input and specify the binary property name (
photoInputoraudioInput). - HTTP Request node — Forward files to another API (e.g., an image recognition service or transcription API).
- Code node — Process binary data with custom JavaScript, for example to resize images or convert audio formats.
Does FlowTrigger work with self-hosted n8n?
Yes. FlowTrigger sends standard HTTP requests to any reachable URL, so it works with self-hosted n8n exactly the same way it works with n8n Cloud.
Requirements for self-hosted n8n:
Your n8n instance must be accessible from the internet (since FlowTrigger sends requests from your phone’s network). Common approaches:
- Reverse proxy — Set up Nginx or Caddy in front of your n8n instance with a domain name and SSL certificate. This is the recommended production setup.
- Cloudflare Tunnel — Expose your local n8n instance through Cloudflare’s tunnel service without opening ports on your firewall.
- ngrok — Quick tunneling for testing. Run
ngrok http 5678to get a public URL pointing to your local n8n instance. Note: the URL changes each time you restart ngrok (unless you have a paid plan). - VPN — If your phone and n8n server are on the same VPN, use the internal IP address directly.
Setup steps:
- Ensure your self-hosted n8n is accessible via one of the methods above.
- Create a workflow with a Webhook node.
- Copy the production webhook URL from your self-hosted instance.
- Paste it into FlowTrigger — it works identically to n8n Cloud.
Security considerations:
- Always use HTTPS for production webhooks to encrypt data in transit.
- Consider adding authentication headers in FlowTrigger’s advanced settings to protect your webhook endpoints.
- n8n supports webhook authentication natively — you can configure Basic Auth or Header Auth on the Webhook node and match it in FlowTrigger’s trigger settings.